

Project Docs
Project Docs is the built-in documentation workspace inside every Umaku project. It gives your team a shared, structured space to write, organize, and maintain all project knowledge — from architecture decisions and onboarding guides to API references and meeting notes.
The editor is built on a modern block-based system (similar to Notion), so you can mix text, headings, lists, code blocks, images, files, and embedded page links in any order. Pages are organized in a tree hierarchy in the sidebar, and every page auto-saves as you type.

What Project Docs gives you
Section titled “What Project Docs gives you”- Rich block editor — headings, paragraphs, lists, code blocks, images, file uploads, and more
- Hierarchical pages — organize content in nested trees with drag-and-drop reordering
- Cover images and icons — give each page a visual identity
- Page linking — embed links to other doc pages directly inside content
- Breadcrumb navigation — always know where you are in the tree
- Auto-save — changes are saved automatically as you type
- AI-powered writing — two built-in AI tools to help you write and understand content faster
Anatomy of a Doc Page
Section titled “Anatomy of a Doc Page”When you open a doc page, you see three main areas.
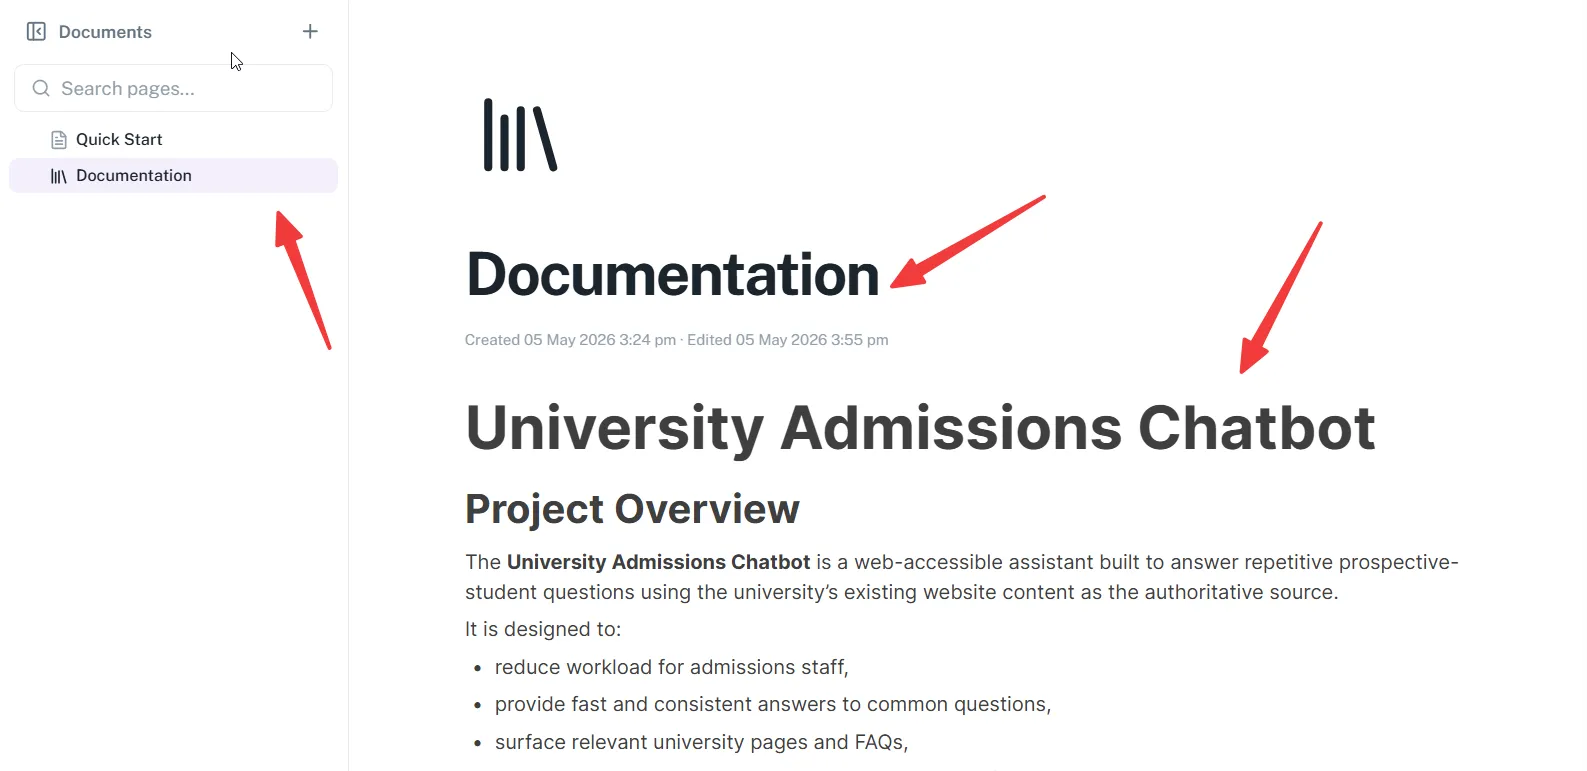
Sidebar (page tree)
Section titled “Sidebar (page tree)”The left sidebar shows all pages in the project as a collapsible tree. You can:
- Click any page to navigate to it
- Use the + button in the top of the sidebar to create a child page
- Drag pages to reorder or reparent them
- Click the ⋯ menu on a page to rename, duplicate, or delete it
Page header
Section titled “Page header”At the top of each page you can add:
- Cover image — a full-width banner image (upload from your device)
- Icon — an emoji or Lucide icon shown in the sidebar and breadcrumbs
- Title — the page name (also shown in the sidebar tree)
The meta toolbar below the title shows the last-saved timestamp and a live save indicator (Saving… / Saved).
Content area
Section titled “Content area”The main content area is the block editor. Click anywhere to start typing. Press / to open the slash menu and insert any block type.
Block Types
Section titled “Block Types”The slash menu (/) gives you access to all available block types.
| Block | Description |
|---|---|
| Text | Standard paragraph |
| Heading 1 / 2 / 3 | Section headings |
| Bullet list | Unordered list |
| Numbered list | Ordered list |
| Check list | To-do items with checkboxes |
| Code block | Syntax-highlighted code |
| Image | Upload or embed an image |
| Video | Upload or embed a Video |
| File | Upload any file as an attachment |
| Table | Structured data table |
| Quote | Block quote |
| Page | Embed a new child page inline |
| Link to page | Insert a reference link to an existing page |
| Help me write ✨ | AI-generated content (see AI Features) |
Tutorials
Section titled “Tutorials”Create your first doc page
Section titled “Create your first doc page”-
Open Project Docs
Section titled “Open Project Docs”From your project’s sidebar, click the Documentations tab.
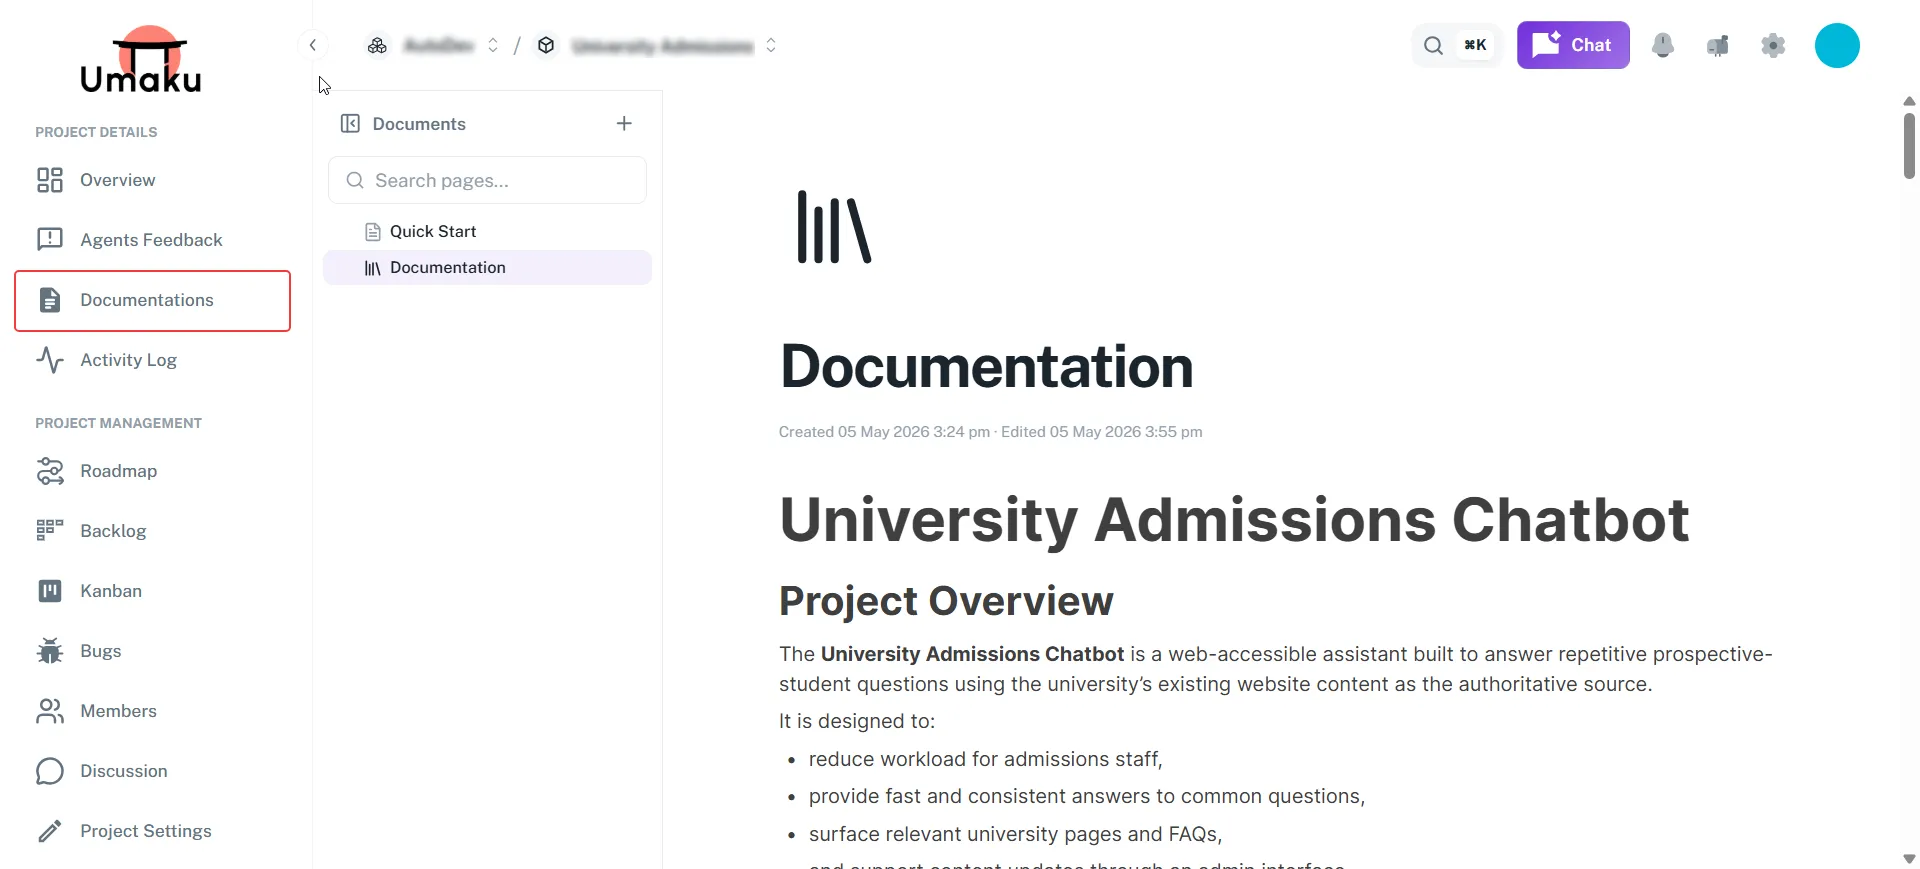
If no pages exist yet, you will see an empty state with a Create your first page button.
-
Create a page
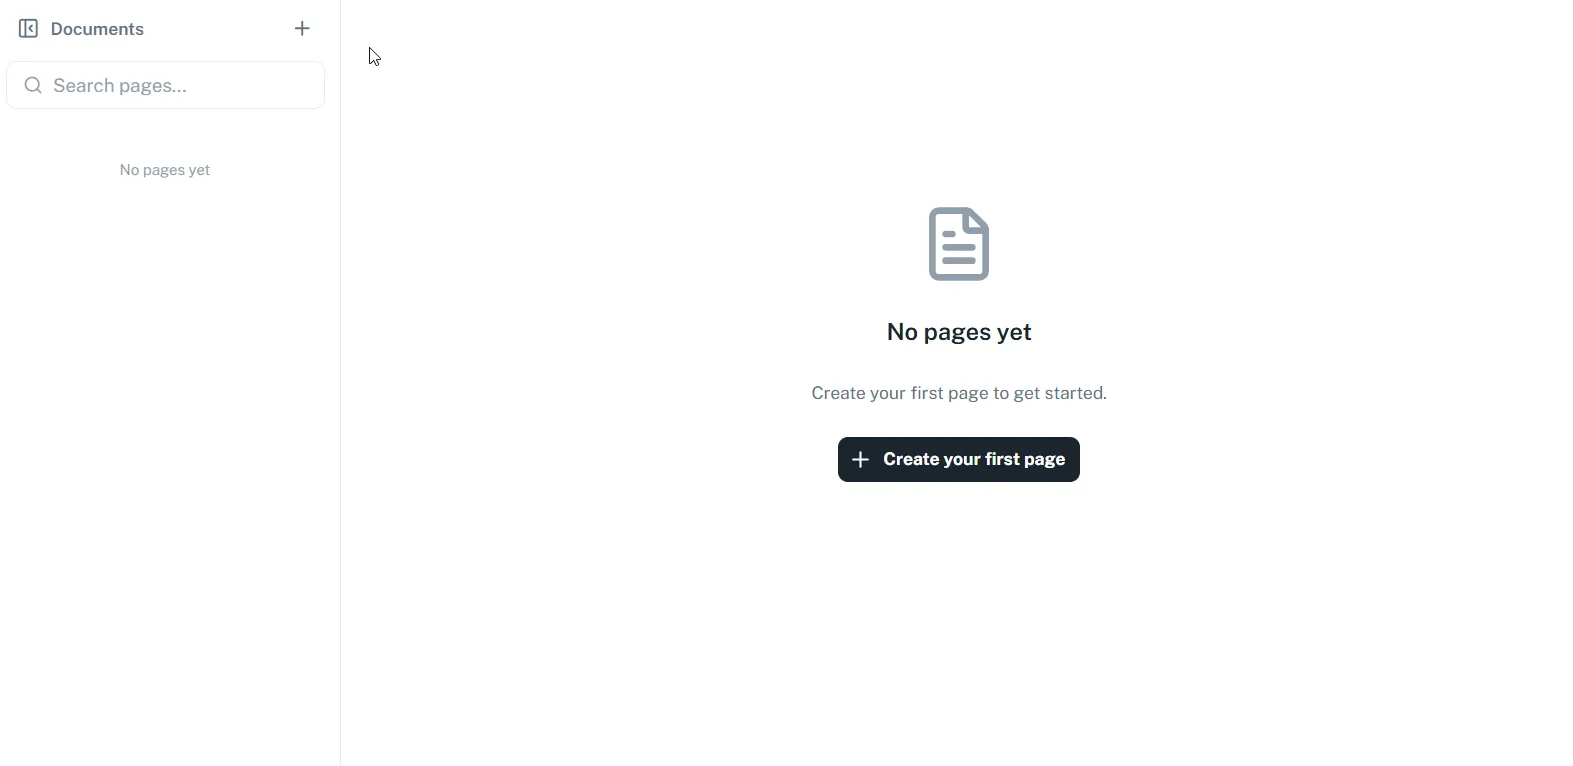
Section titled “Create a page”Click Create your first page (or the + icon at the top of the sidebar).
A new untitled page opens immediately in the editor.
-
Add a title
Section titled “Add a title”Click the title area at the top and type your page name. The title is saved automatically and appears in the sidebar.
-
Add a cover image and icon (optional)
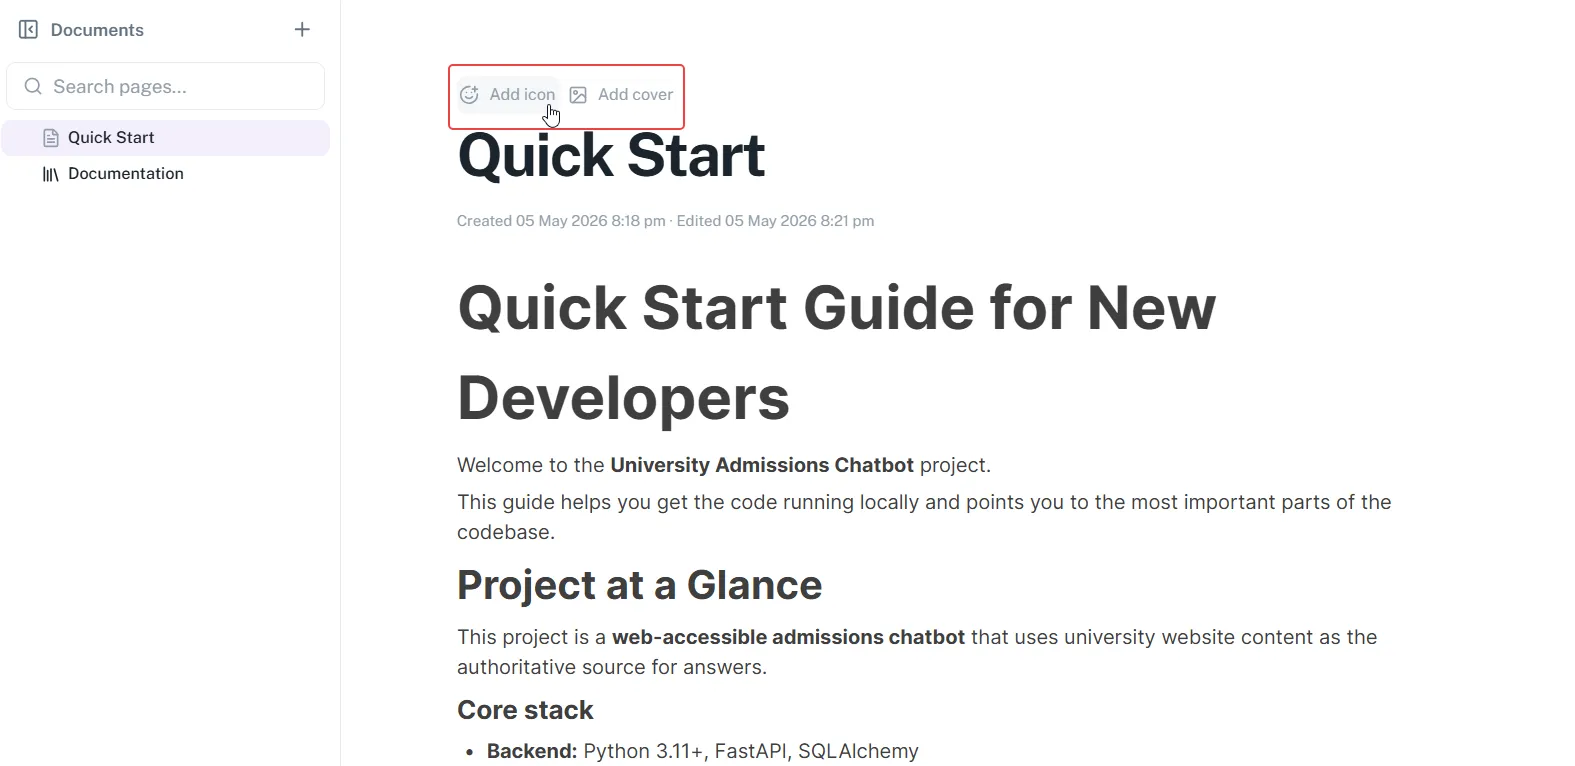
Section titled “Add a cover image and icon (optional)”Hover over the title area to reveal the Add cover and Add icon buttons.
- Add cover — opens a file picker to upload a banner image
- Add icon — opens an icon picker to choose a Lucide icon
-
Write content
Section titled “Write content”Click below the title and start typing. Press
/at any point to open the slash menu and insert a block.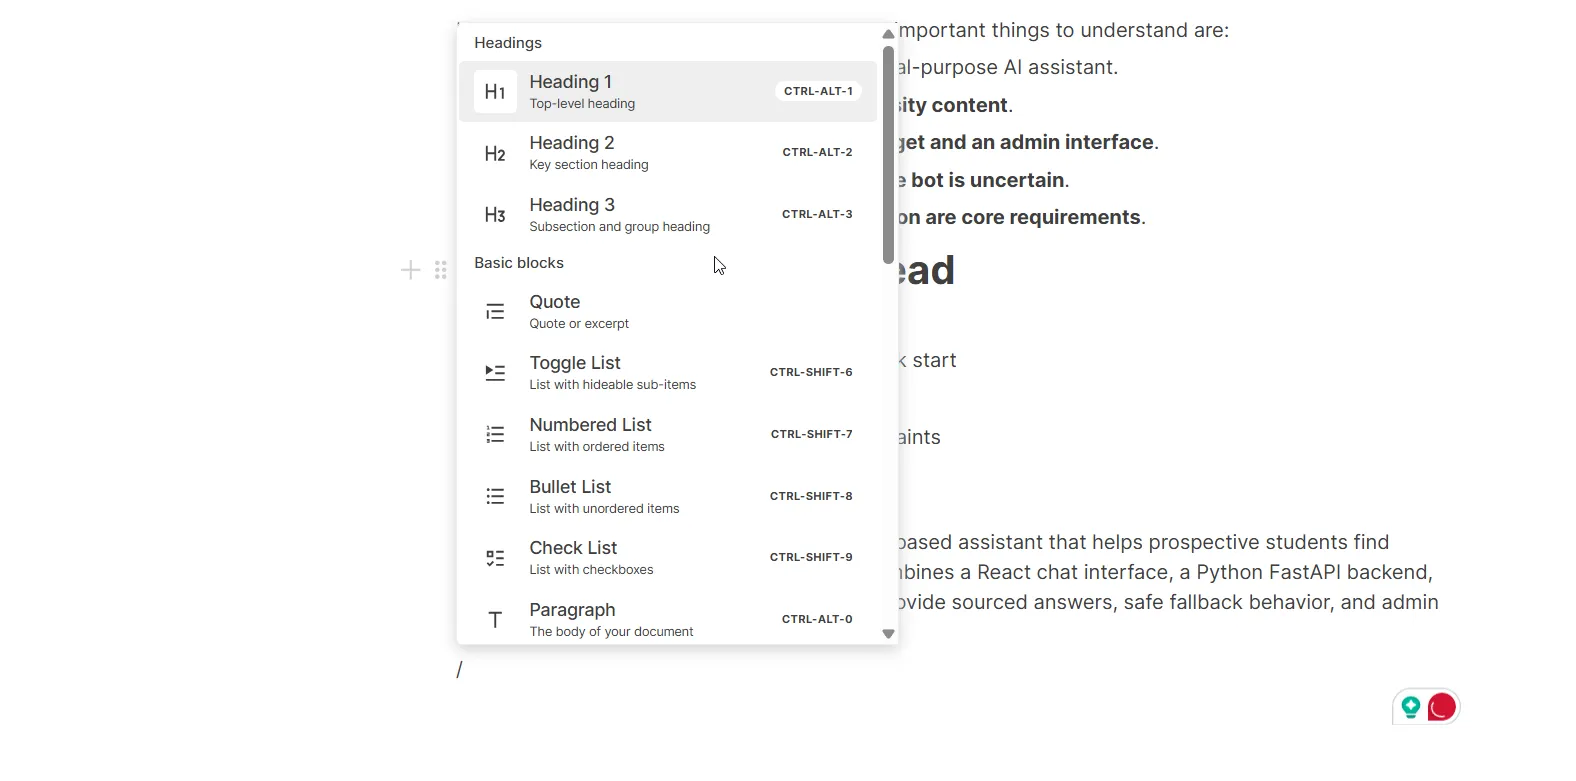
The page auto-saves as you type. The save indicator in the meta toolbar shows Saving… while a save is in progress and Saved when complete.
Organize pages in a tree
Section titled “Organize pages in a tree”-
Create a child page
Section titled “Create a child page”Type
/in the editor and select Page from the slash menu. This creates a child page and embeds a link to it inline at the cursor position.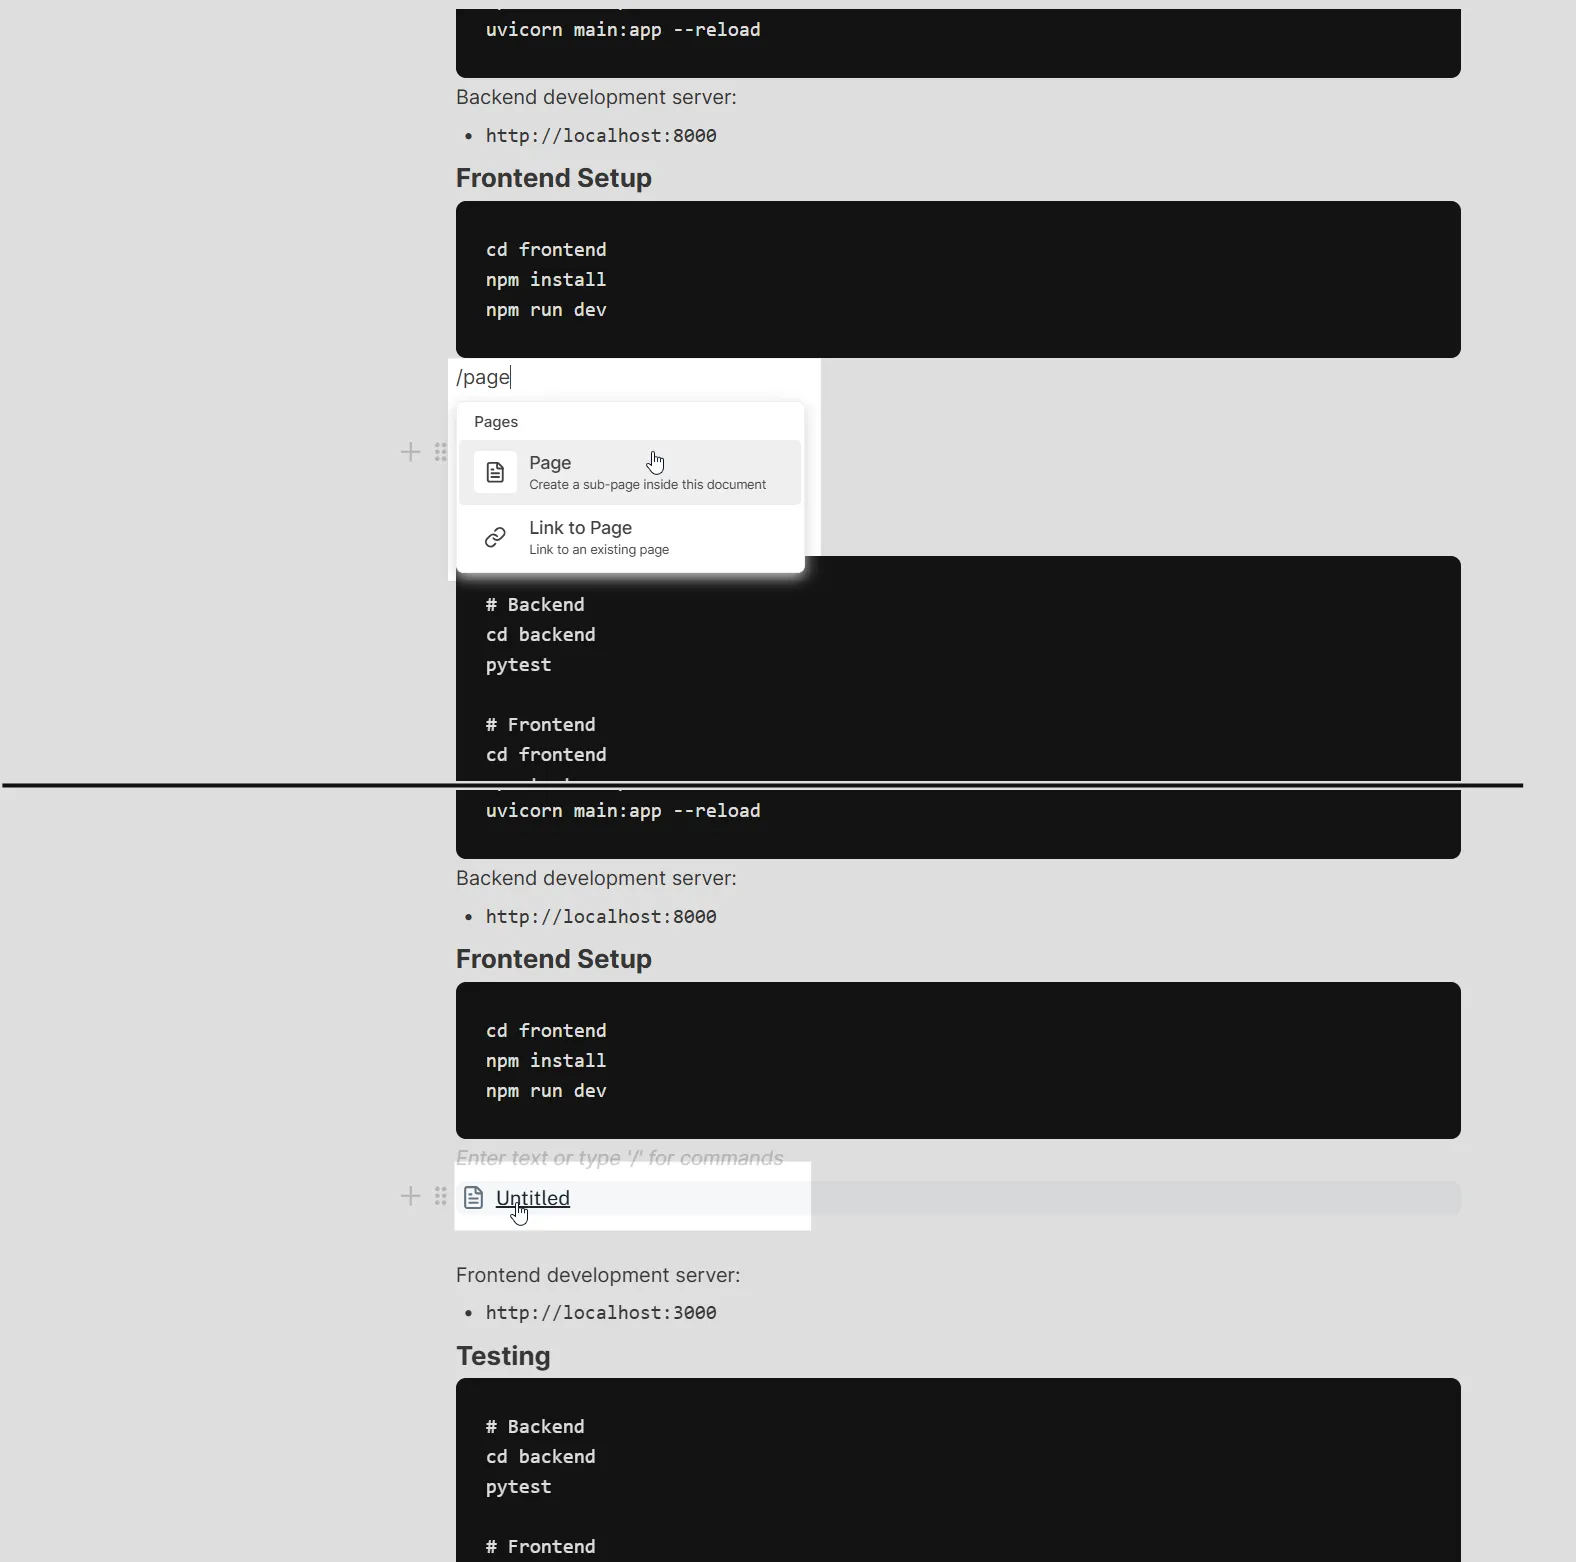
-
Navigate the tree
Section titled “Navigate the tree”Click any page in the sidebar to open it. The breadcrumb trail below the title shows the full path from the root to the current page.
-
Reorder pages
Section titled “Reorder pages”Drag a page in the sidebar to a new position. You can move it to a different level in the hierarchy by dropping it onto another page (to make it a child) or between pages (to reorder at the same level).
-
Link to an existing page
Section titled “Link to an existing page”To insert a reference link to another page without creating a new one, type
/and select Link to page. A picker dialog opens where you can search and select any page in the project.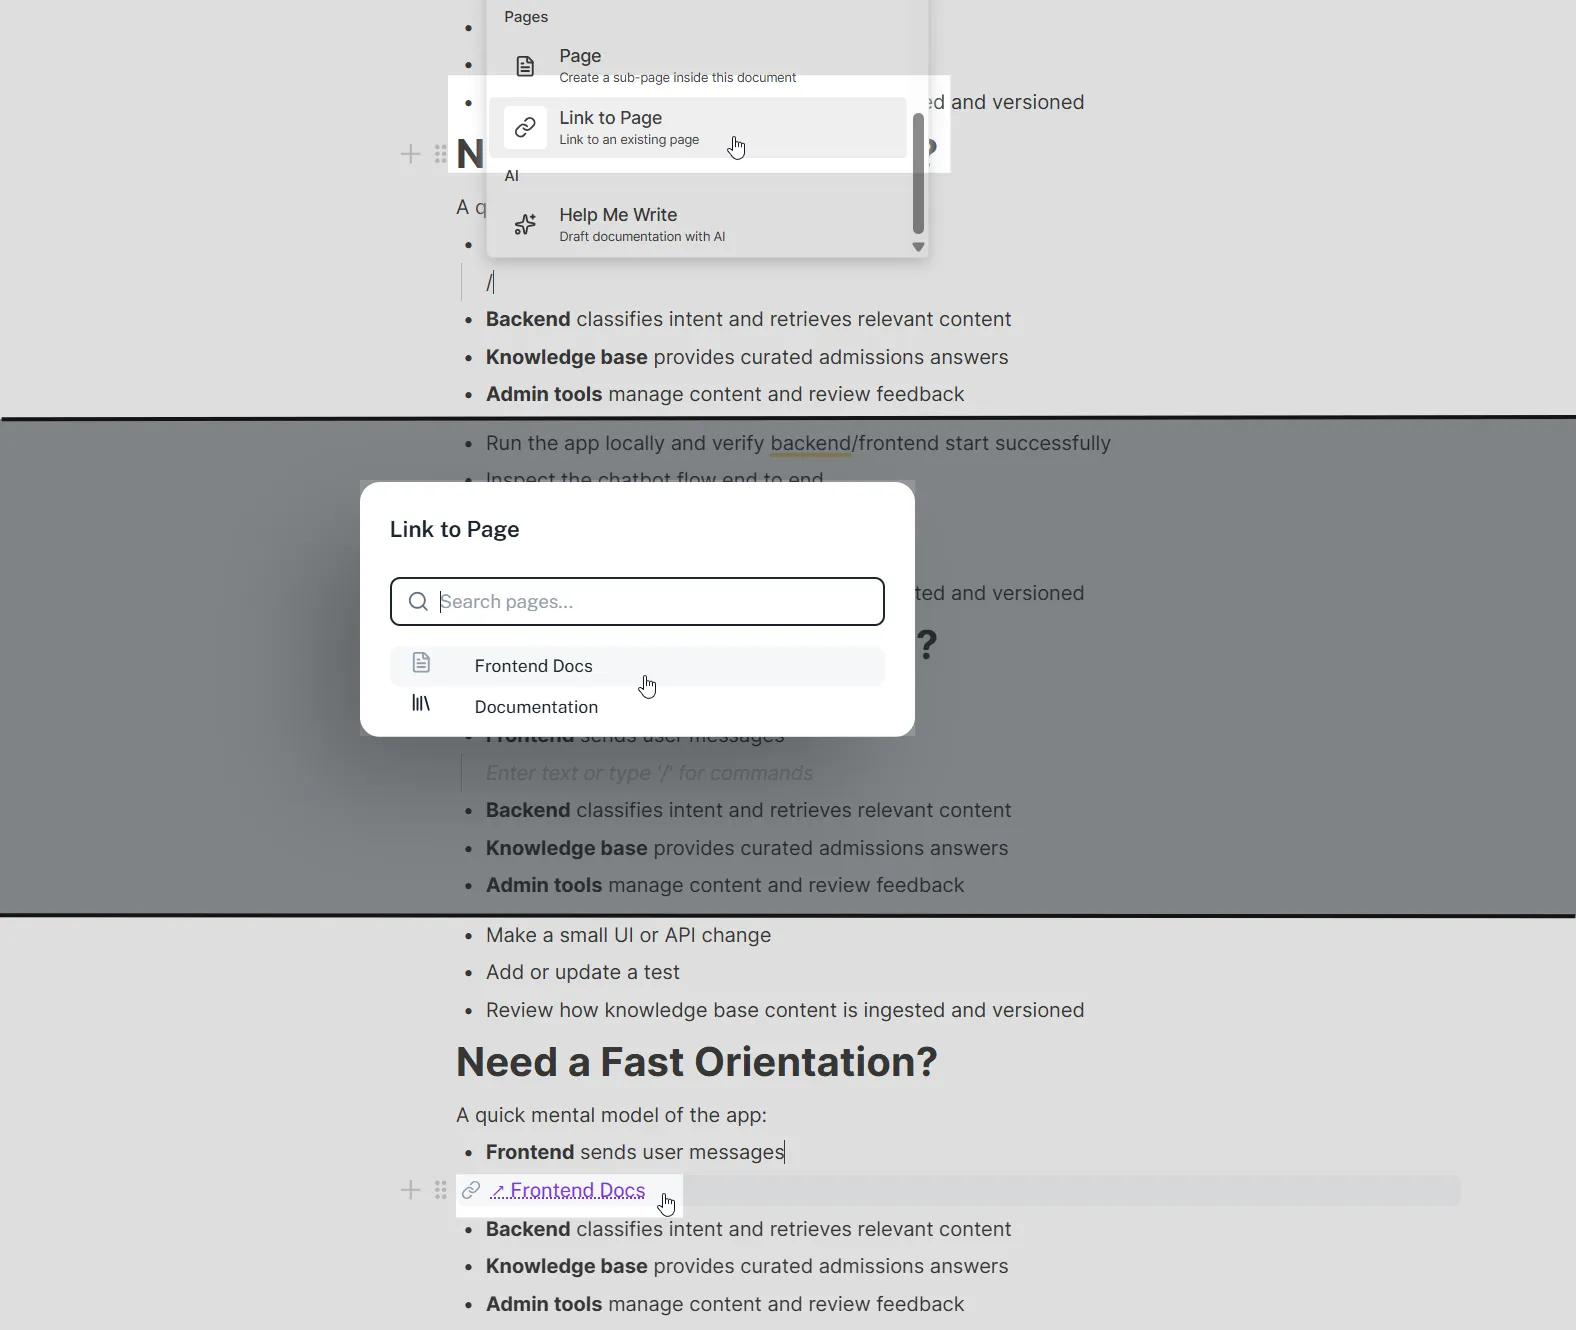
AI Features
Section titled “AI Features”Project Docs includes two AI-powered tools that work directly inside the editor. Both tools are context-aware — they can draw on your project’s tickets, code, and other documentation to give more relevant answers and generate more accurate content.
Ask AI
Section titled “Ask AI”Ask AI lets you highlight any text in the editor and ask the AI a question about it. The AI reads the selected content and answers in a popover — no page navigation required.
When to use it:
- Understand a complex section written by a teammate
- Cross-reference selected content against tickets or code

How to use Ask AI
Section titled “How to use Ask AI”-
Select text and open Ask AI
Section titled “Select text and open Ask AI”Highlight any text in the editor. The formatting toolbar appears above the selection. At the right end of the toolbar, click the ✨ sparkle icon (Ask AI button) — a popover opens anchored to the toolbar.
-
Choose a scope and ask your question
Section titled “Choose a scope and ask your question”In the Search scope field, select one or more context sources (Tickets, Code, or Docs), then type your question and press Enter or click the send button.
-
Read the response
Section titled “Read the response”The AI response streams in below the input field, rendered as formatted text. Close the popover to dismiss everything — no conversation is saved.
Help Me Write
Section titled “Help Me Write”Help Me Write is an AI content generator triggered from the slash menu. You describe what you want to write, choose a scope, The AI generates a full draft that you can preview, then insert directly into the editor as formatted blocks.
When to use it:
- Draft a new section from scratch (e.g., “Write an onboarding guide for the authentication module”)
- Generate a summary of a sprint or feature based on existing tickets
- Create boilerplate documentation (API reference, architecture overview, runbook)

How to use Help Me Write
Section titled “How to use Help Me Write”-
Open the slash menu and select Help me write
Section titled “Open the slash menu and select Help me write”Place your cursor where you want to insert content. Type
/, scroll to the AI group (or typeaito filter), and select Help me write. A dialog opens. -
Describe what you want and choose a scope
Section titled “Describe what you want and choose a scope”In the prompt field, describe the content you want generated — be specific. Then select one or more context sources from the Search scope field (Tickets, Code, or Docs).
Example prompts:
- “Write a technical overview of the authentication flow, including JWT token lifecycle and refresh strategy”
- “Create a runbook for deploying the API service to production”
-
Generate
Section titled “Generate”Click Generate ✨. The AI response streams into the preview area, rendered as formatted markdown.
-
Review and insert
Section titled “Review and insert”Once generation is complete, three action buttons appear. Click Insert to add the content to your page as editable blocks, Regenerate to re-run the same prompt, or Discard to close without inserting.
Tips and best practices
Section titled “Tips and best practices”Structure your docs early. Create a top-level page for each major area (e.g., Architecture, Onboarding, API Reference, Decisions) and build the tree from there. A clear structure makes the AI context more useful too.
Use icons and covers. Adding an icon to each page makes the sidebar easier to scan, especially in large projects with many pages.
Link pages together. Use the Link to page block (/link-to-page) to cross-reference related pages. This keeps your docs interconnected and helps the AI understand relationships when you use the Docs scope.
Be specific with AI prompts. For Help Me Write, a prompt like “Write a deployment runbook for the Node.js API service, covering environment variables, Docker build steps, and rollback procedure” produces much better output than “Write a runbook”.
Use Ask AI for quick lookups. Instead of switching tabs to check a ticket or bug, highlight the relevant text in your doc and use Ask AI with the Tickets or Code scope to get an instant answer in context.
Auto-save is always on. You don’t need to press Save. The save indicator in the meta toolbar shows the current state. Avoid closing the tab while it shows Saving….